The making of the breakfast room
After several months, my breakfast room is almost ready! It still need some curtains and details, but I'm quite happy with how it looks already. I first wanted to turn it into a dining room, but it quickly didn't feel like a dining room to me. I love breakfast, so the idea of a breakfast room seemed fun. Now it's (almost) finished I think it's the perfect room for having breakfast! I can imagine sitting there, with the morning sun shining throught the big windows...
Breakfast on a summer morning
Breakfast on a winter morning
I first removed the old walpaper with water. Some glue remained on the walls, so I had do sand them. After I've done that, I put the electricity in place and covered the walls with non-woven wallpaper.
Once the walls were covered I could really start. The first thing I did was making the floor. I love herringbone parquet in old mansions, so it was quicly decided. I used long wooden slats and cut them all the same size. The slats had all a slighty different color, so I mixed them togheter. I glued them on some paper in the shape of the room. Unfortunately I didn't think of coloring the paper in a matching color with the wood, so at some points you see a little bit of white paper between the slats... next time I'll remember to color the paper. When the whole floor was covered, I thought it looked rather pale, so I used a dark oak varnish.
Now it was time to add the skirting boards and cornices. I was very much looking forward to this. I also wanted to do wall panelling. The skirting boards and mouldings went quite easily.
I didn't want to buy wall panelling with standard sizes, I wanted them to fit the size of the wall. I first cut rectangles with the right size from the non-woven wallpaper and then cut half-round wooden slats the right length. I glued the slats to the edges of the rectangles. I used a thicker and a thinner slat together. It took me a few days just to do this! With the gold paint on it, it was exactly as I wanted. And it was worth all the effort.
.
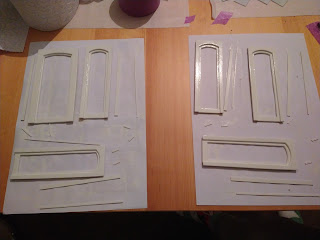
I also intended to change all the windows so they have a more French look. I cut out the middel piece and replaced it with another division


Thank you so much! I bought them on https://dollshouseinterior.co.uk. As well as the chandelier.
ReplyDeleteI'd like to hear about your ceiling medallion. Did you make (how) or buy it?
ReplyDeleteI bought it also on https://dollshouseinterior.co.uk
DeleteAmei, estou fazendo uma casinha e vou lê todo os posts anteriores. Obrigada
ReplyDeleteThank you! That's so sweet!
DeleteAmazing hard works you done!
ReplyDeleteI do love wooden floor and golden colored wall decorations. Would like to have British milk tea in there
Thank you! It was a lot of work indeed, but worth the effort!
DeleteAmazing and stunning work. Thank you so much for sharing.
ReplyDeleteThank you so much!
Delete